Every Course and Brand setting in ZipCourse, explained
Updated 1 October 2026
The panel on the right of the editor has three tabs. Slide edits the slide you have selected. Course and Brand hold the settings for the whole course: how it's scored, when it counts as complete, how learners move through it, whether a perfect quiz earns a game, and how it looks. Here is every one of them, and what it changes for learners and for your LMS.
Changes save as you make them and show on the stage straight away. Press Preview, at the top right, to try the course as a learner, with a log of what your LMS would record.
The Course tab
Details
What the course is called, and how your LMS and learners' browsers identify it.
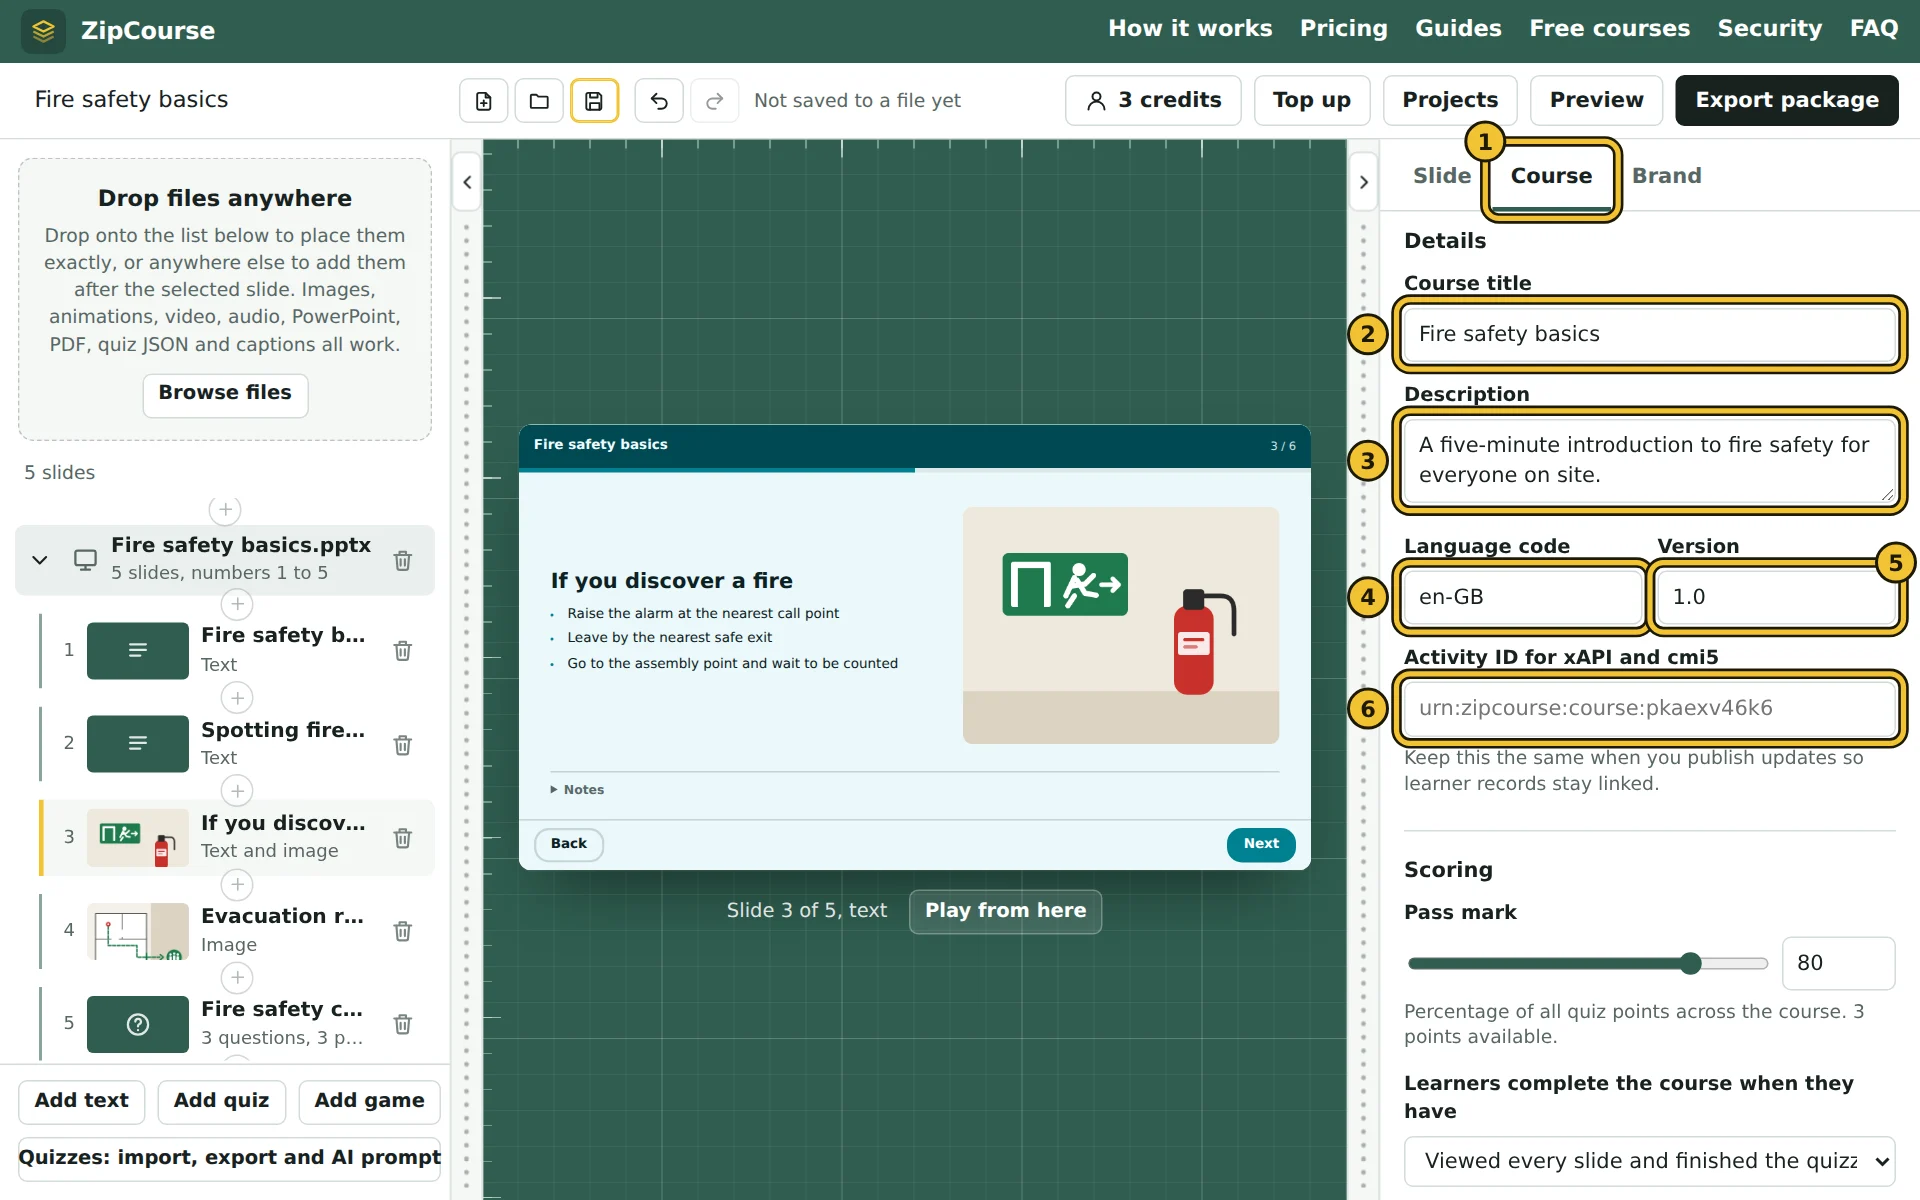
- 1The Course tab.
- 2Course title: the name your LMS shows, and the title in the course's header unless you set Header text in Brand. It's the same title as the one at the top left of the editor.
- 3Description: a sentence or two about the course. cmi5 and xAPI packages include it, and LMSs that support them can show it in their catalogue.
- 4Language code, such as en, en-GB or fr: tells browsers and screen readers what language the course is in, so its words are read aloud correctly.
- 5Version: your own label for this version, such as 1.0 or 2.1. SCORM packages record it; learners don't see it.
- 6Activity ID for xAPI and cmi5: the name that identifies the course in learning records. ZipCourse makes one for you. Keep it the same when you publish updates, so new records join up with old ones.
Scoring
Scoring applies once the course has a quiz. Without one there's nothing to score, and the course is complete when every slide has been viewed.
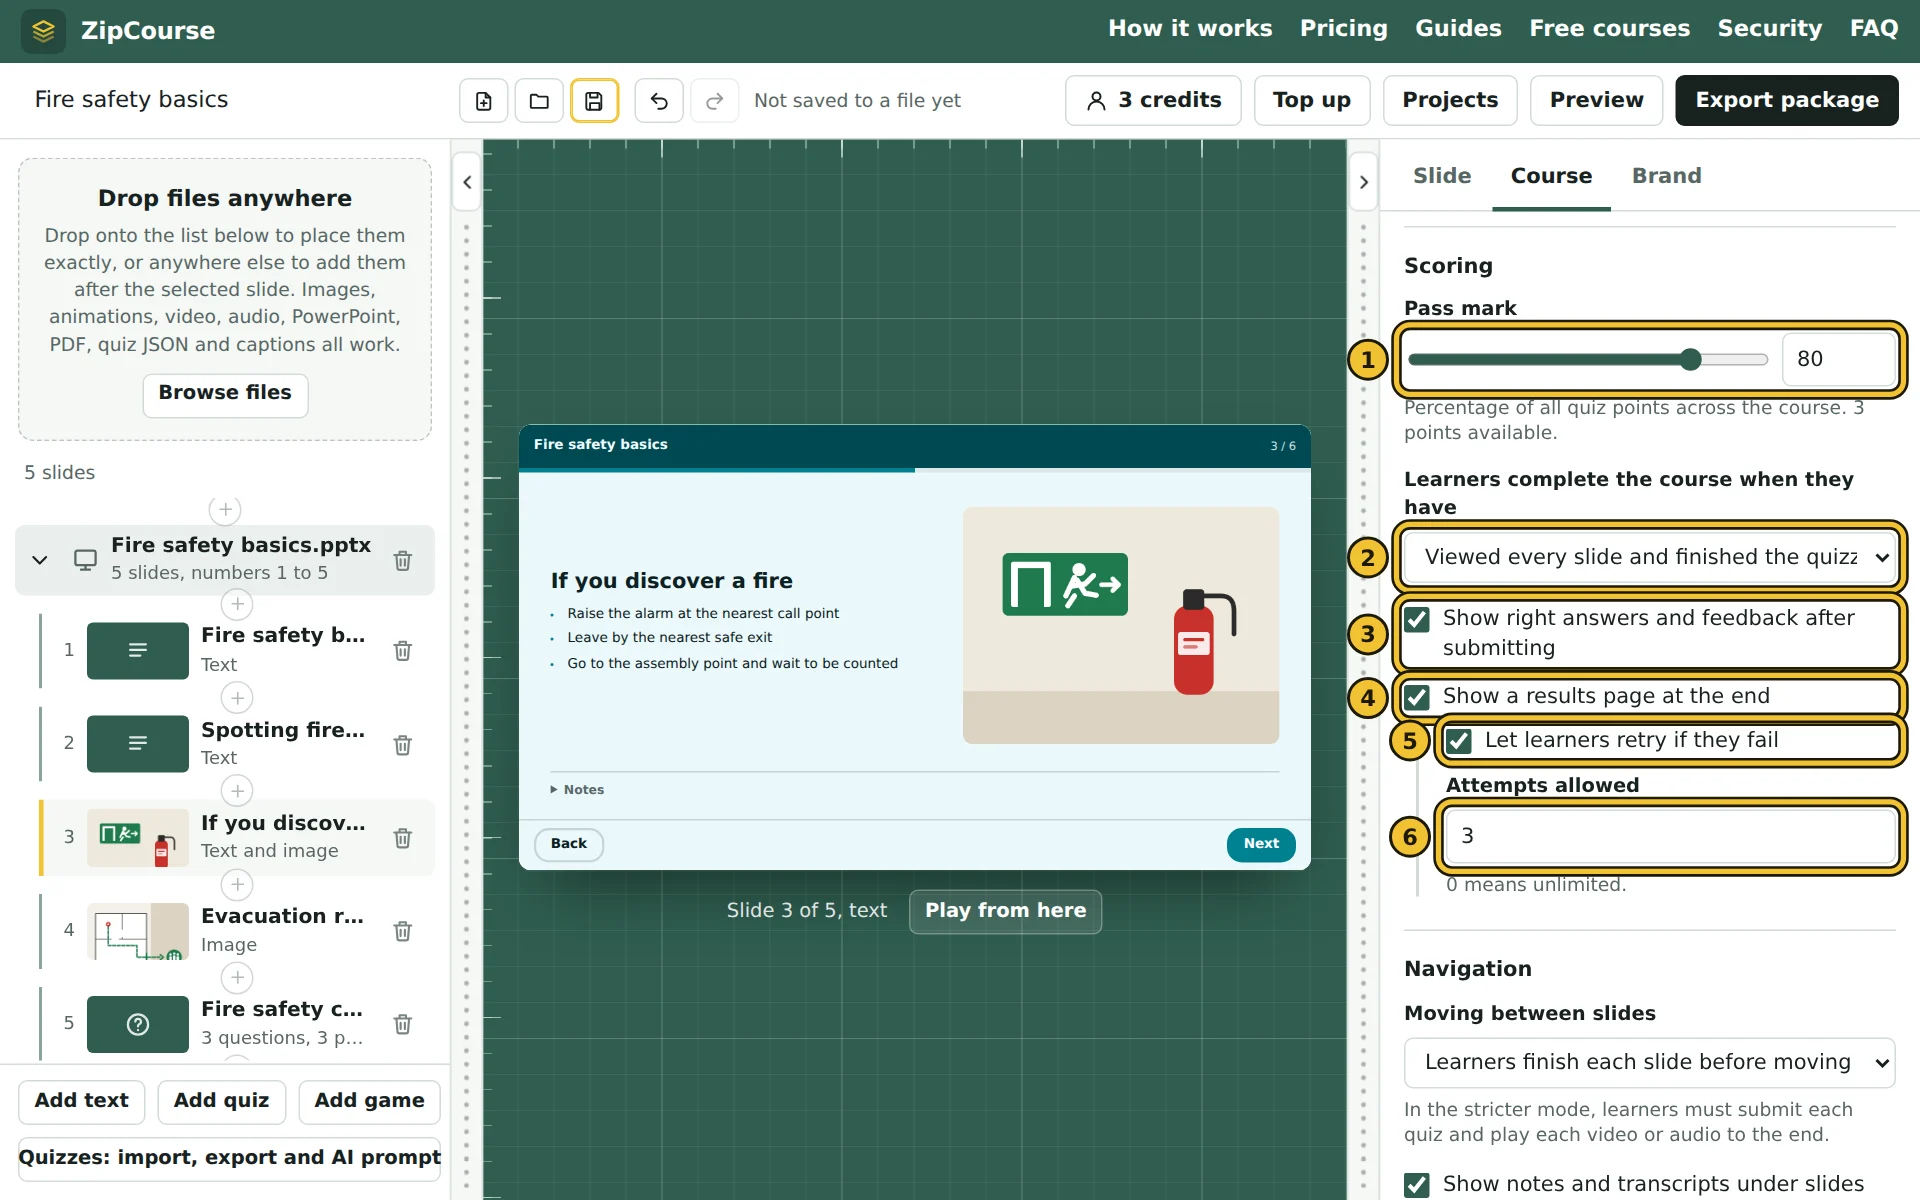
- 1Pass mark: the percentage of all the quiz points in the course a learner needs to pass. Drag the slider or type a number. Each question is worth 1 point unless you give it more on its quiz slide.
- 2Learners complete the course when they have: viewed every slide and finished the quizzes, finished the quizzes, or viewed every slide. A quiz is finished once its answers are submitted, pass or fail. Whether they passed is reported to your LMS separately, once every quiz is done.
- 3Show right answers and feedback after submitting: when it's on, each question shows whether it was right, marks the right answers and shows your feedback. When it's off, learners see only their score.
- 4Show a results page at the end: a last page with the learner's score and the pass mark.
- 5Let learners retry if they fail: puts Try again on the results page. It clears their answers and takes them back to the first quiz. Because retrying happens on the results page, this sits under it, and turning the results page off turns retries off too.
- 6Attempts allowed: how many tries each learner gets, counting the first. 0 means unlimited.
This is what learners see after submitting a quiz, with right answers and feedback on:
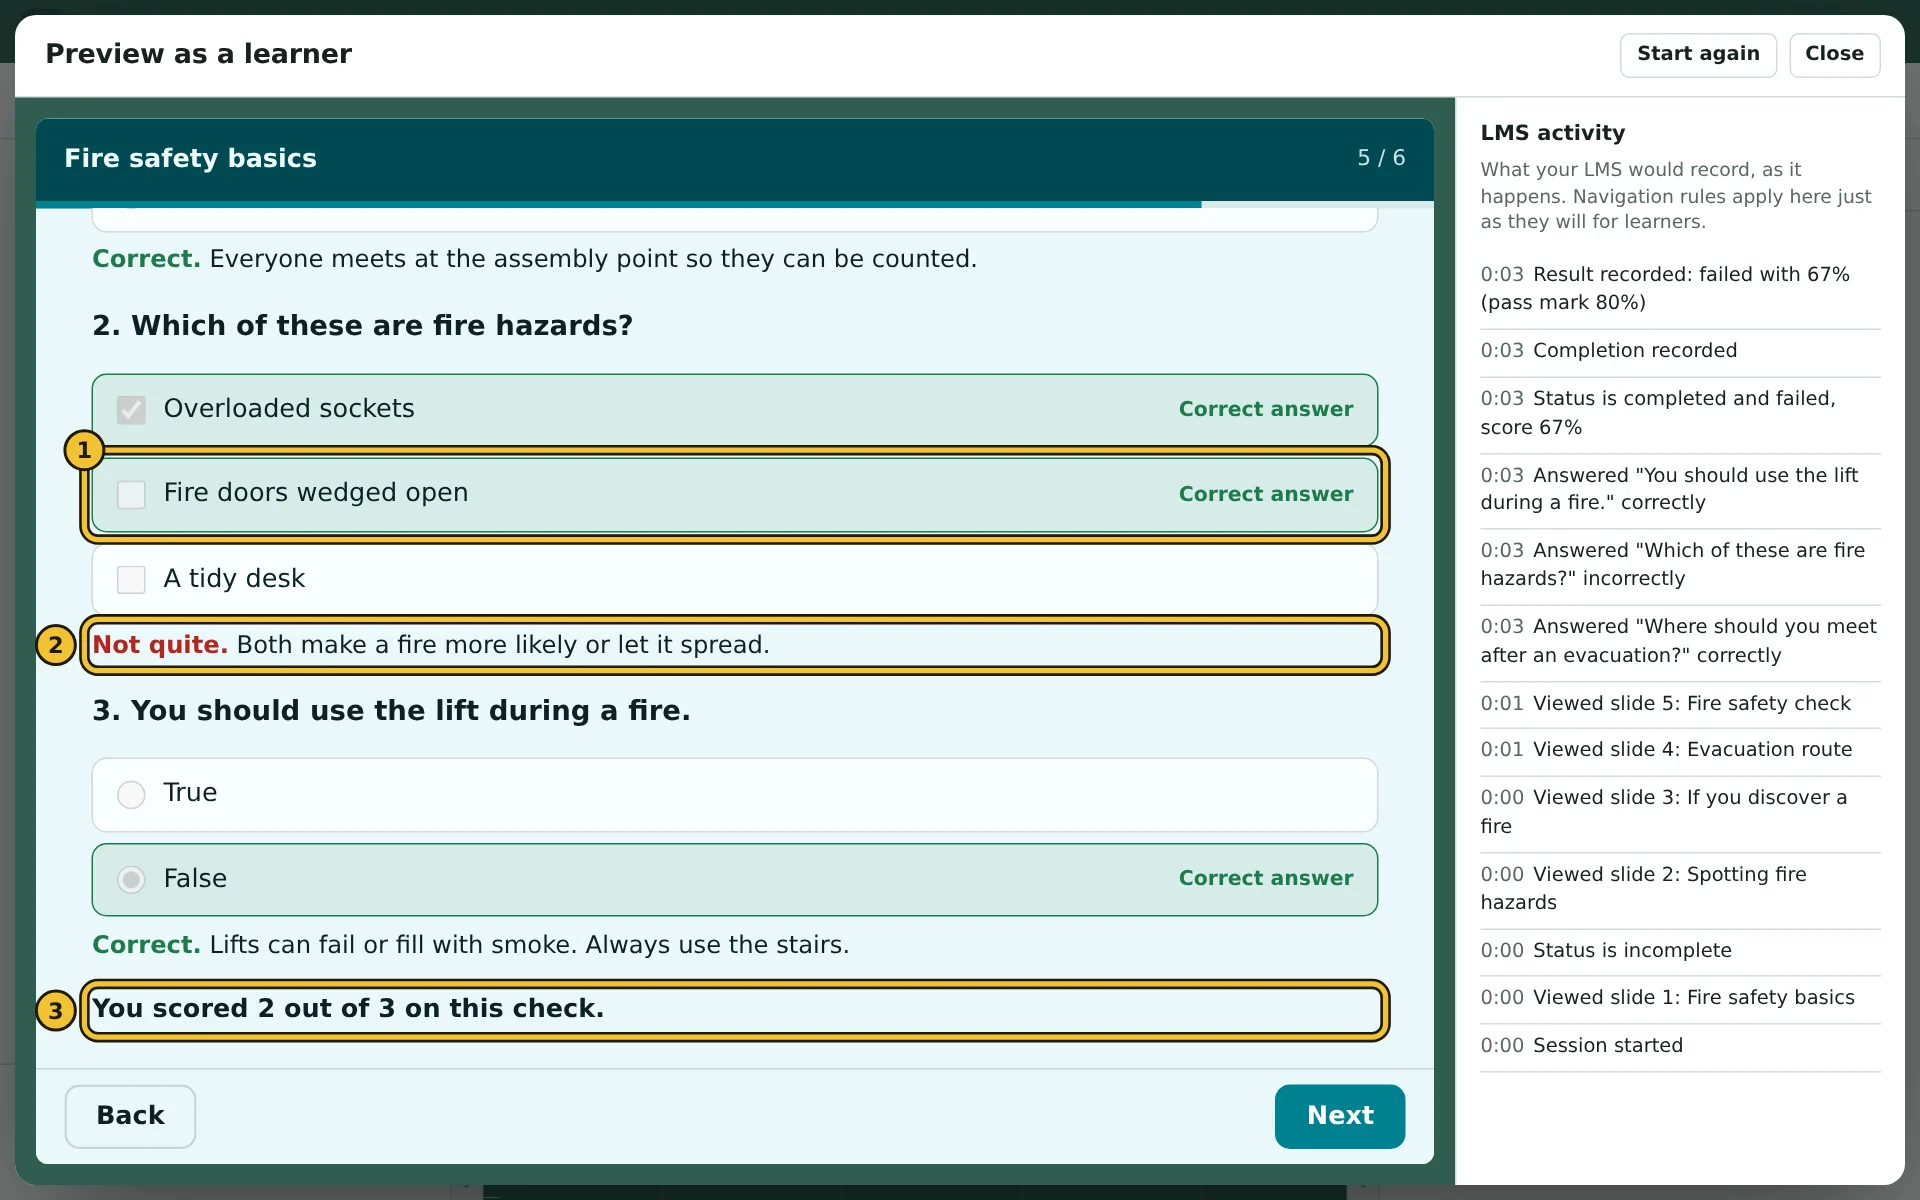
- 1A right answer the learner missed, marked Correct answer.
- 2Your feedback for the question, after Correct or Not quite.
- 3The learner's score for this quiz, which shows whether feedback is on or off.
And the results page, here after a failed first attempt with 3 attempts allowed. With more than one quiz, it also lists the score for each.
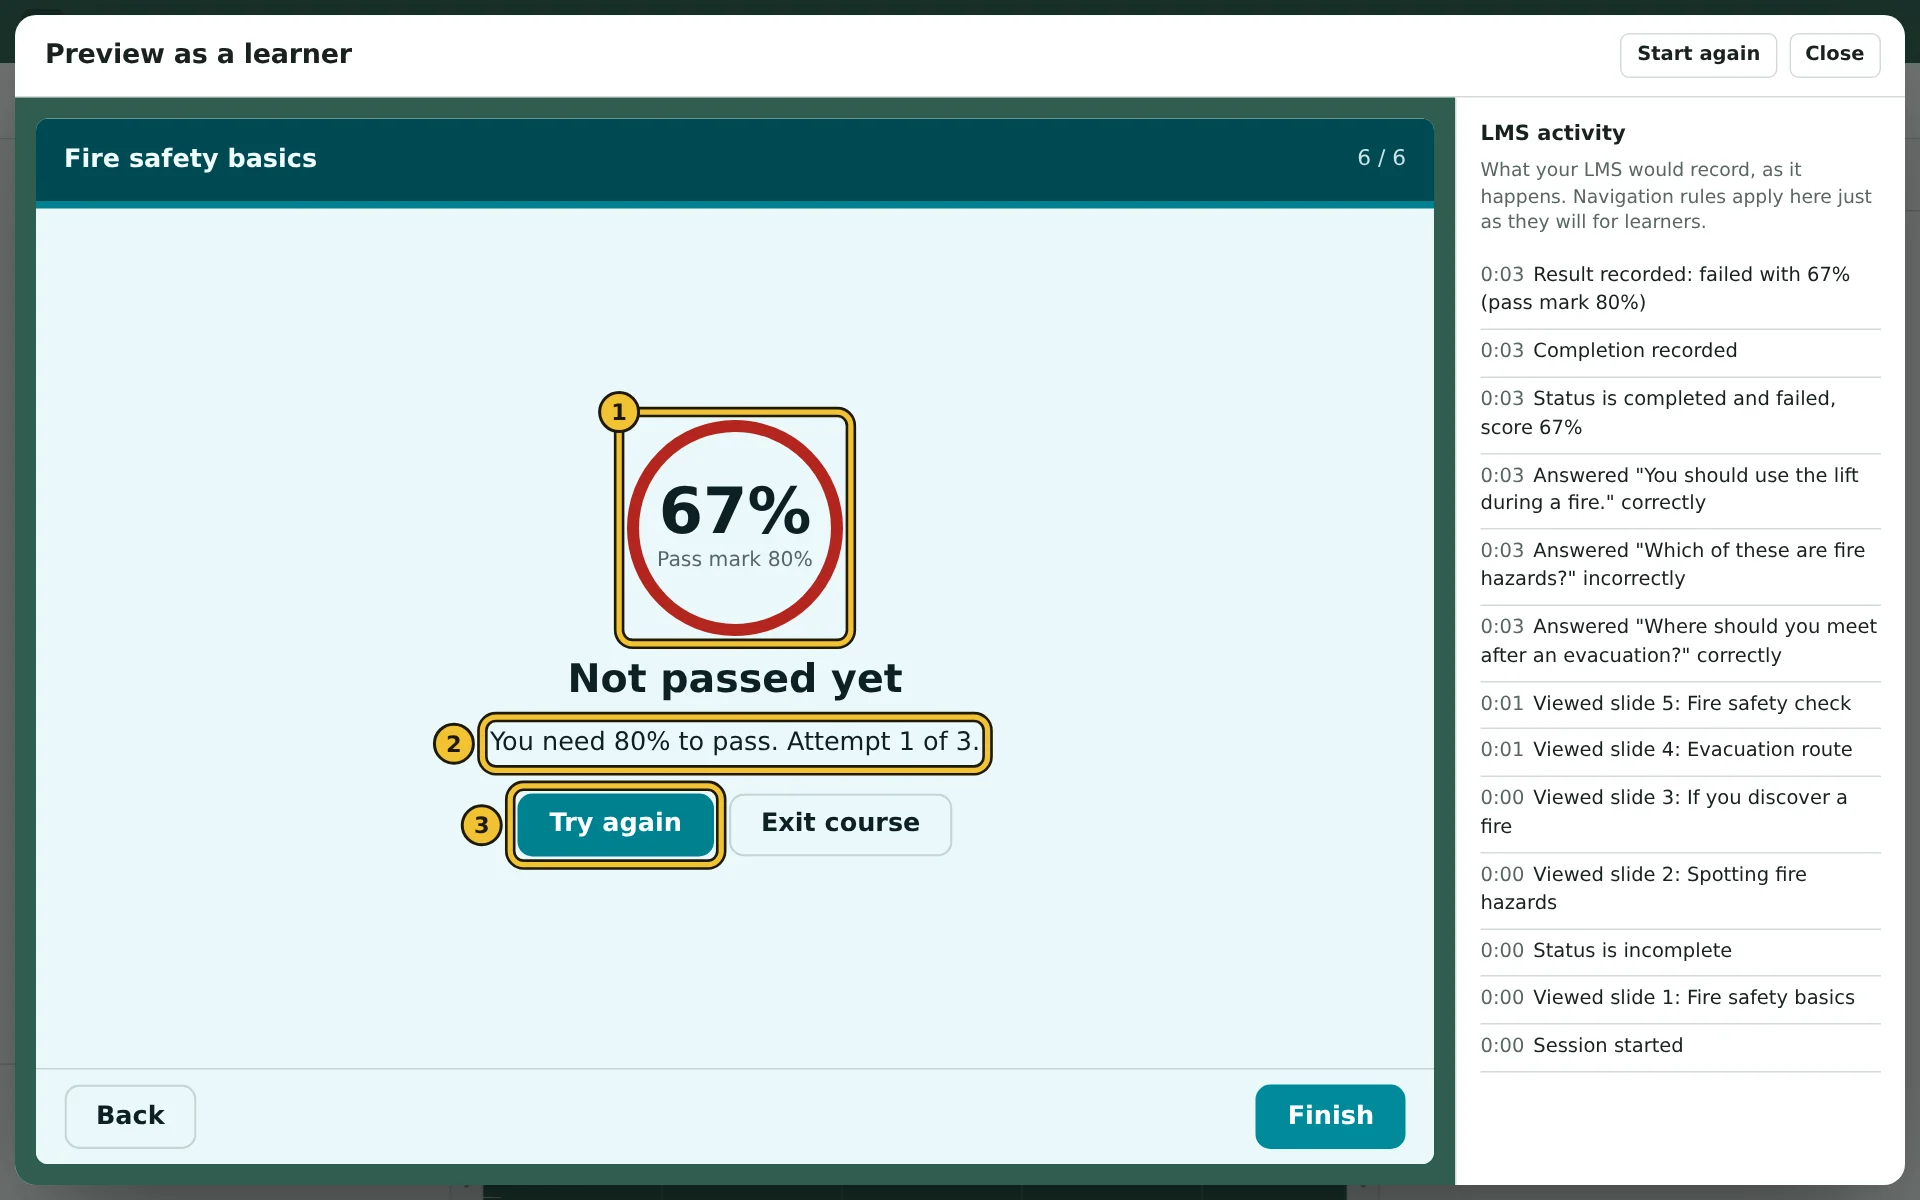
- 1The learner's score and your pass mark.
- 2What they need to pass, and which attempt this was.
- 3Try again, there while they have attempts left. Where the LMS lets a course close itself, an Exit course button sits beside it.
Navigation
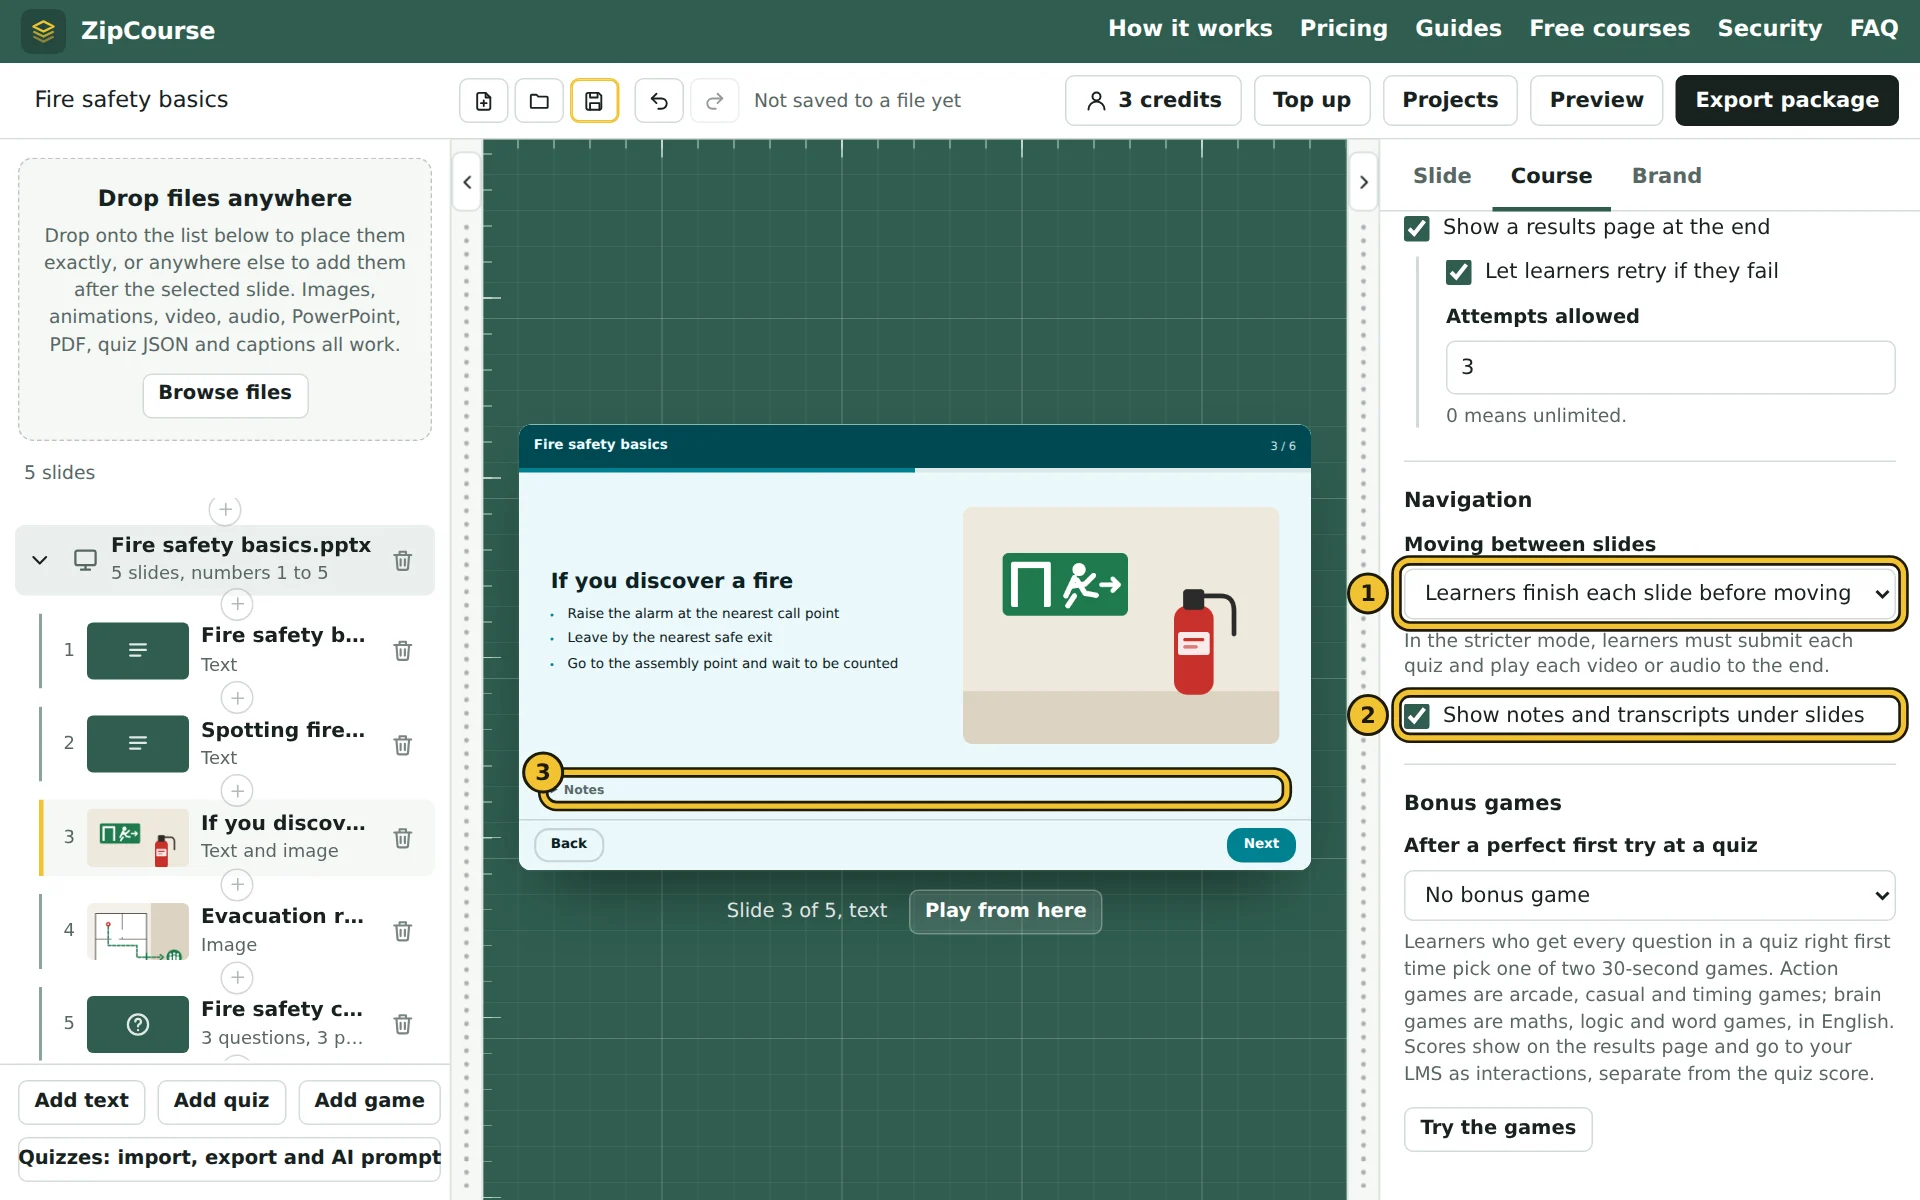
- 1Moving between slides: "Learners can move freely" lets them skip ahead. "Learners finish each slide before moving on" holds them on a slide until they have submitted its quiz, played its video or audio to the end, or listened to its narration.
- 2Show notes and transcripts under slides: shows each slide's Notes or Transcript text under it.
- 3The Notes (called Transcript on video and audio slides), which learners open and close. Slides without any have none.
In the stricter mode, a learner who hasn't finished a slide sees what to do, and Next waits until they have done it:
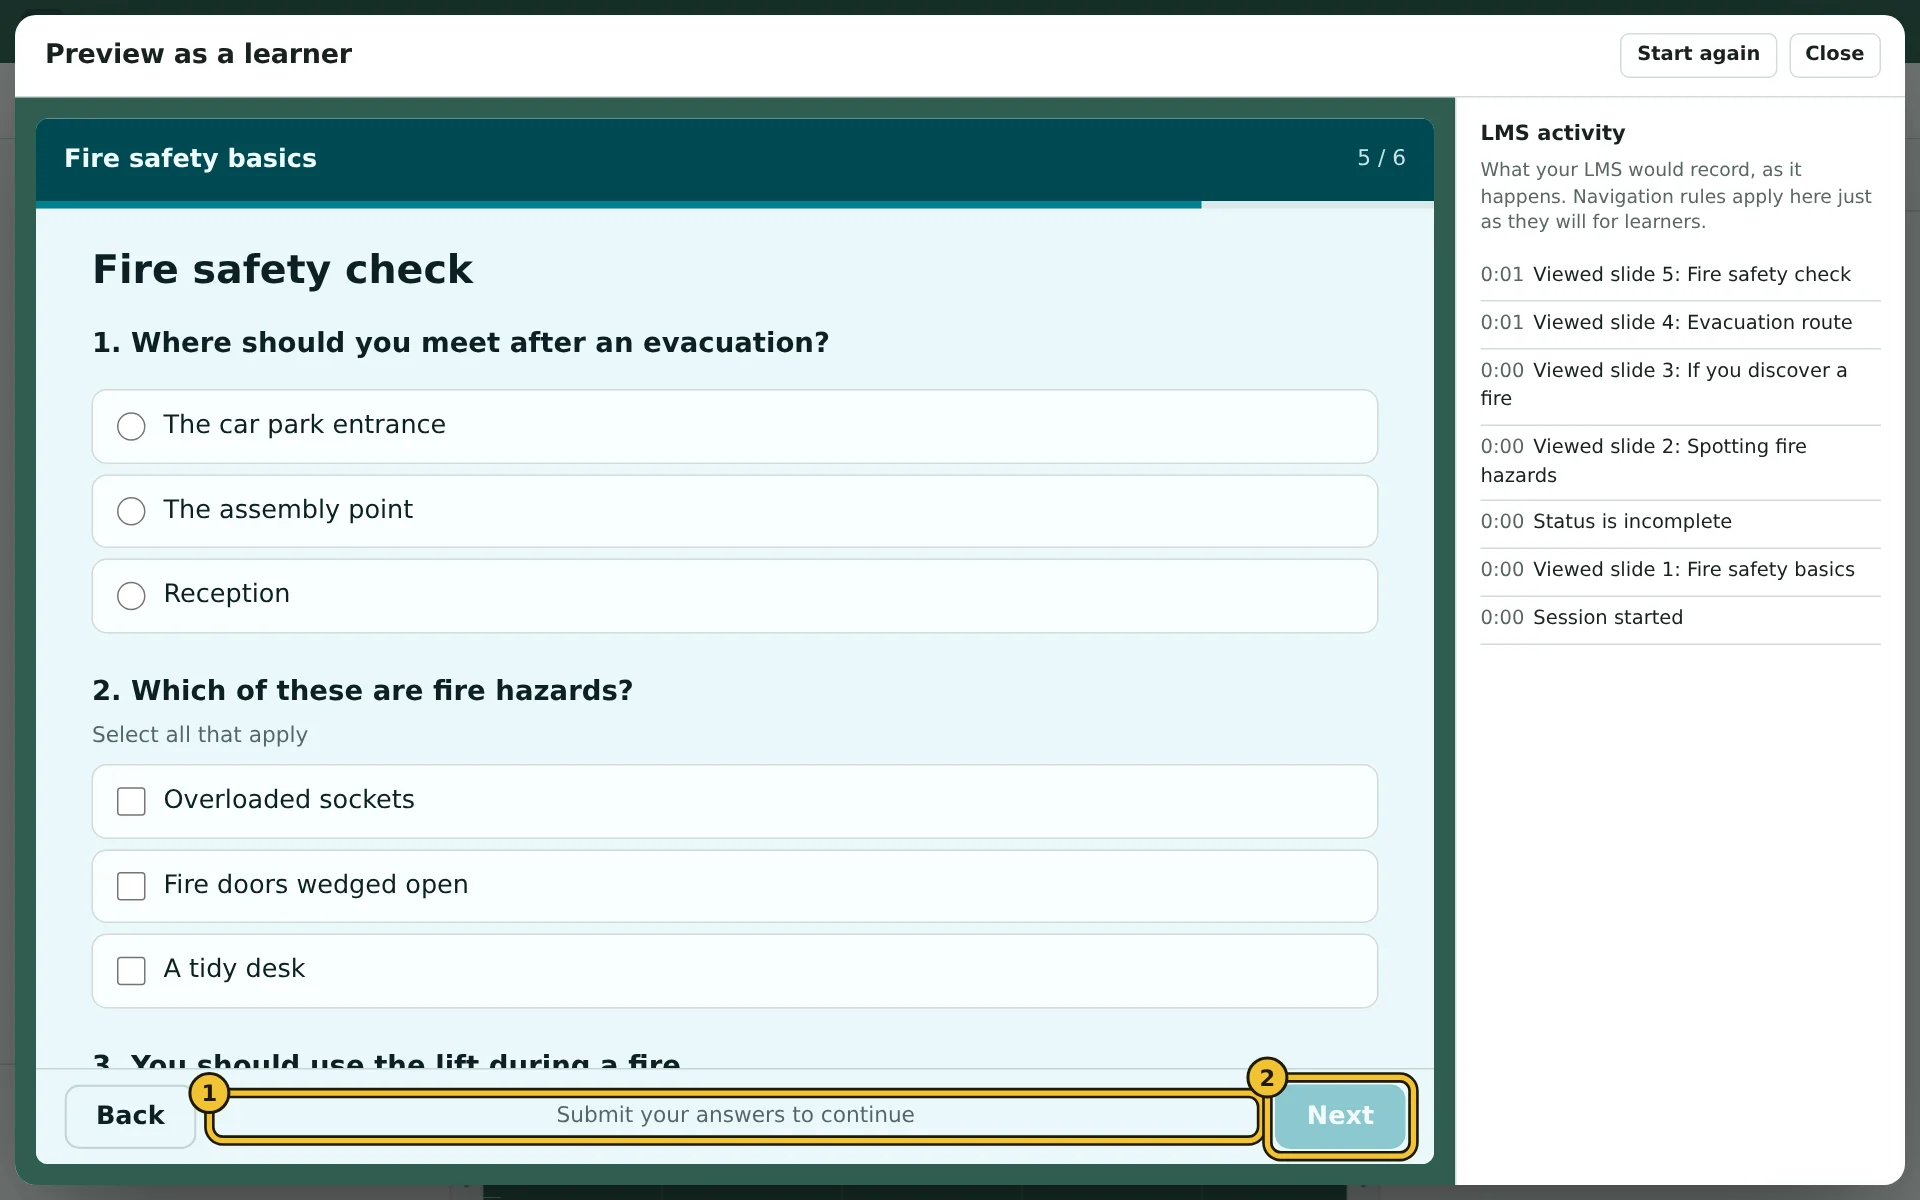
- 1What the learner needs to do to carry on.
- 2Next, unavailable until they have done it. Back always works.
Bonus games
An optional reward: learners who get every question in a quiz right on their first try can play a 30-second game. How to add games covers them, and game slides, in full.
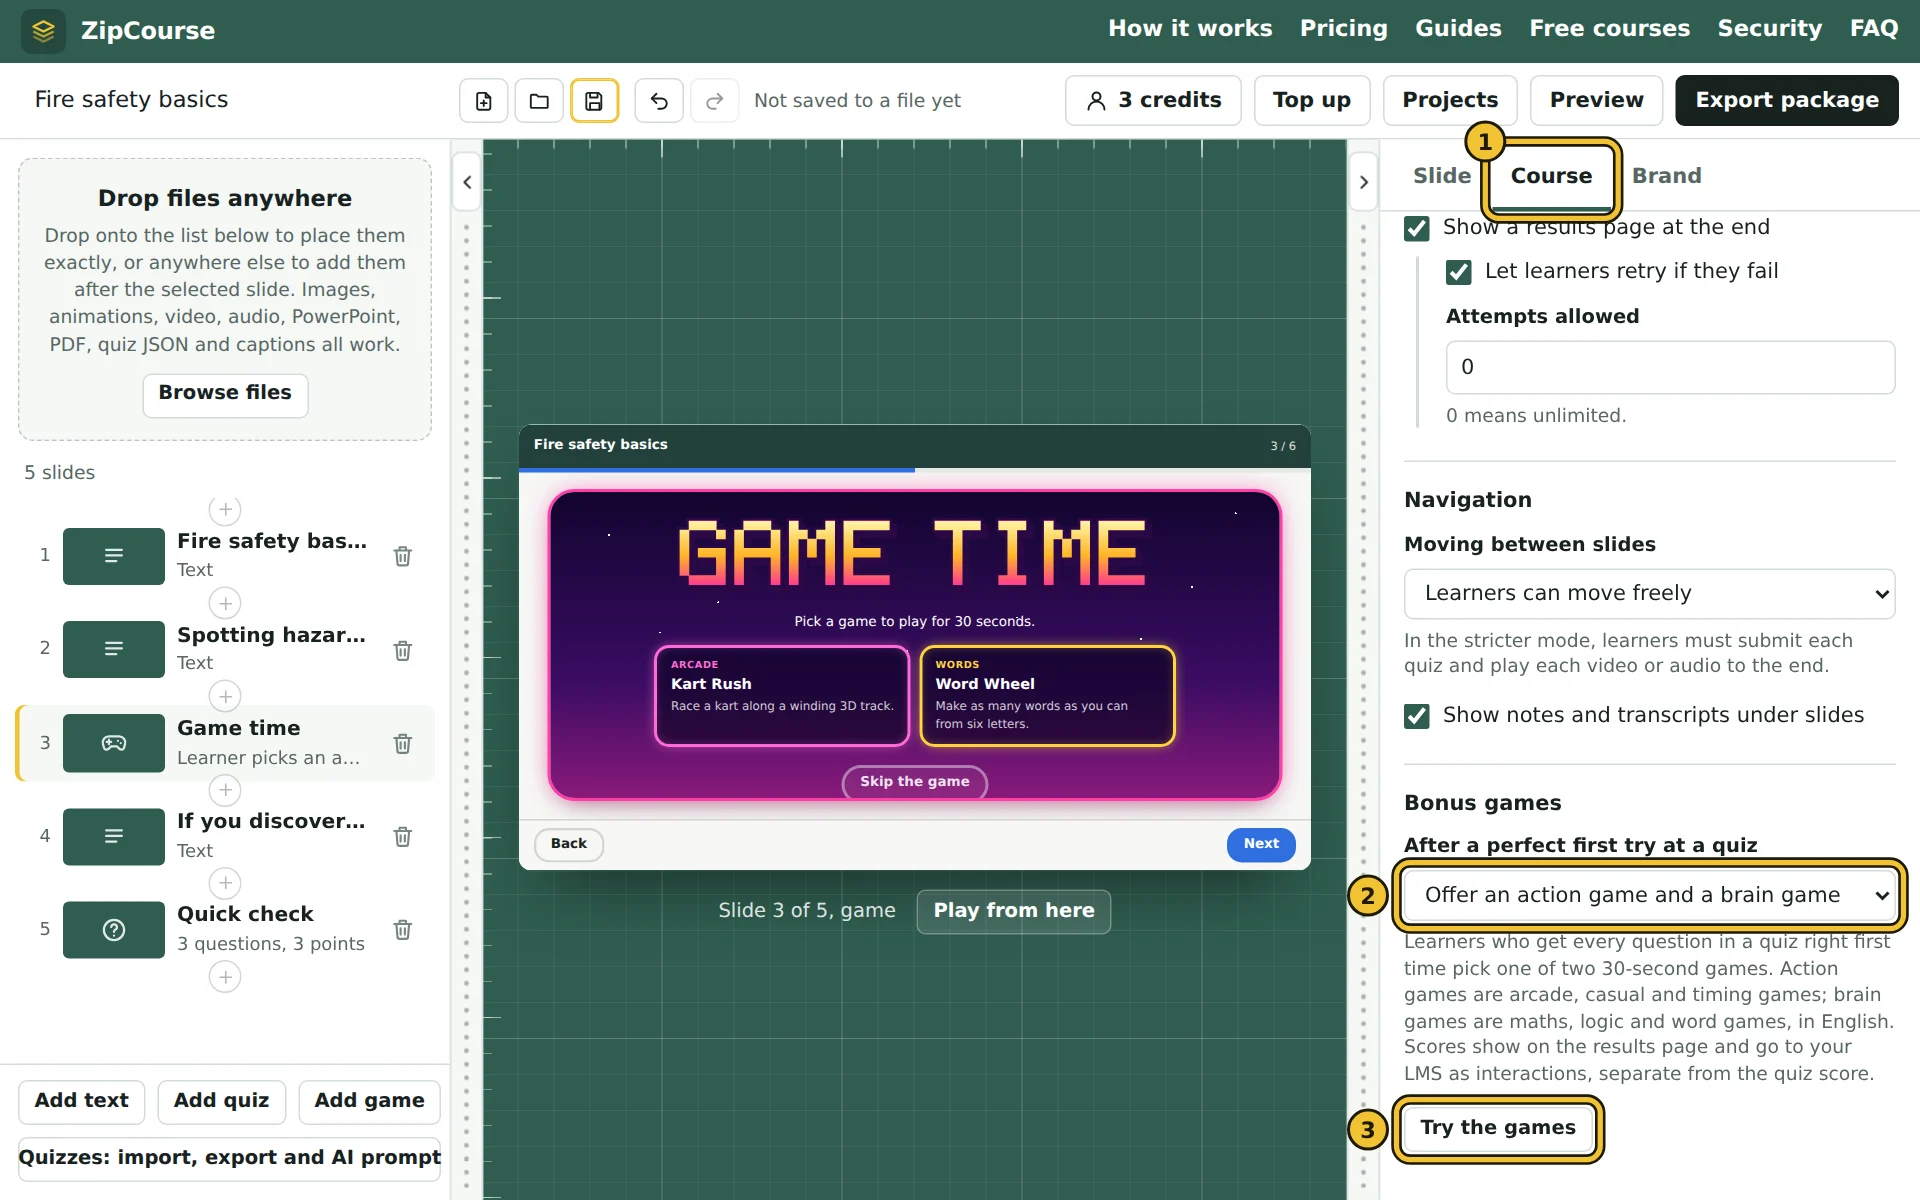
- 1The Course tab. Bonus games is its last section.
- 2After a perfect first try at a quiz: "No bonus game" (the setting for new courses), or offer an action game and a brain game, two action games, or two brain games. Learners choose one of the two, or skip it.
- 3Try the games: play any of the games yourself, in your course's colours.
Game scores show on the results page and go to your LMS as records of their own. They never count towards the pass mark or completion.
The Brand tab
Brand sets how the whole course looks in every package. It doesn't change your slides' words or pictures.
Logo and header
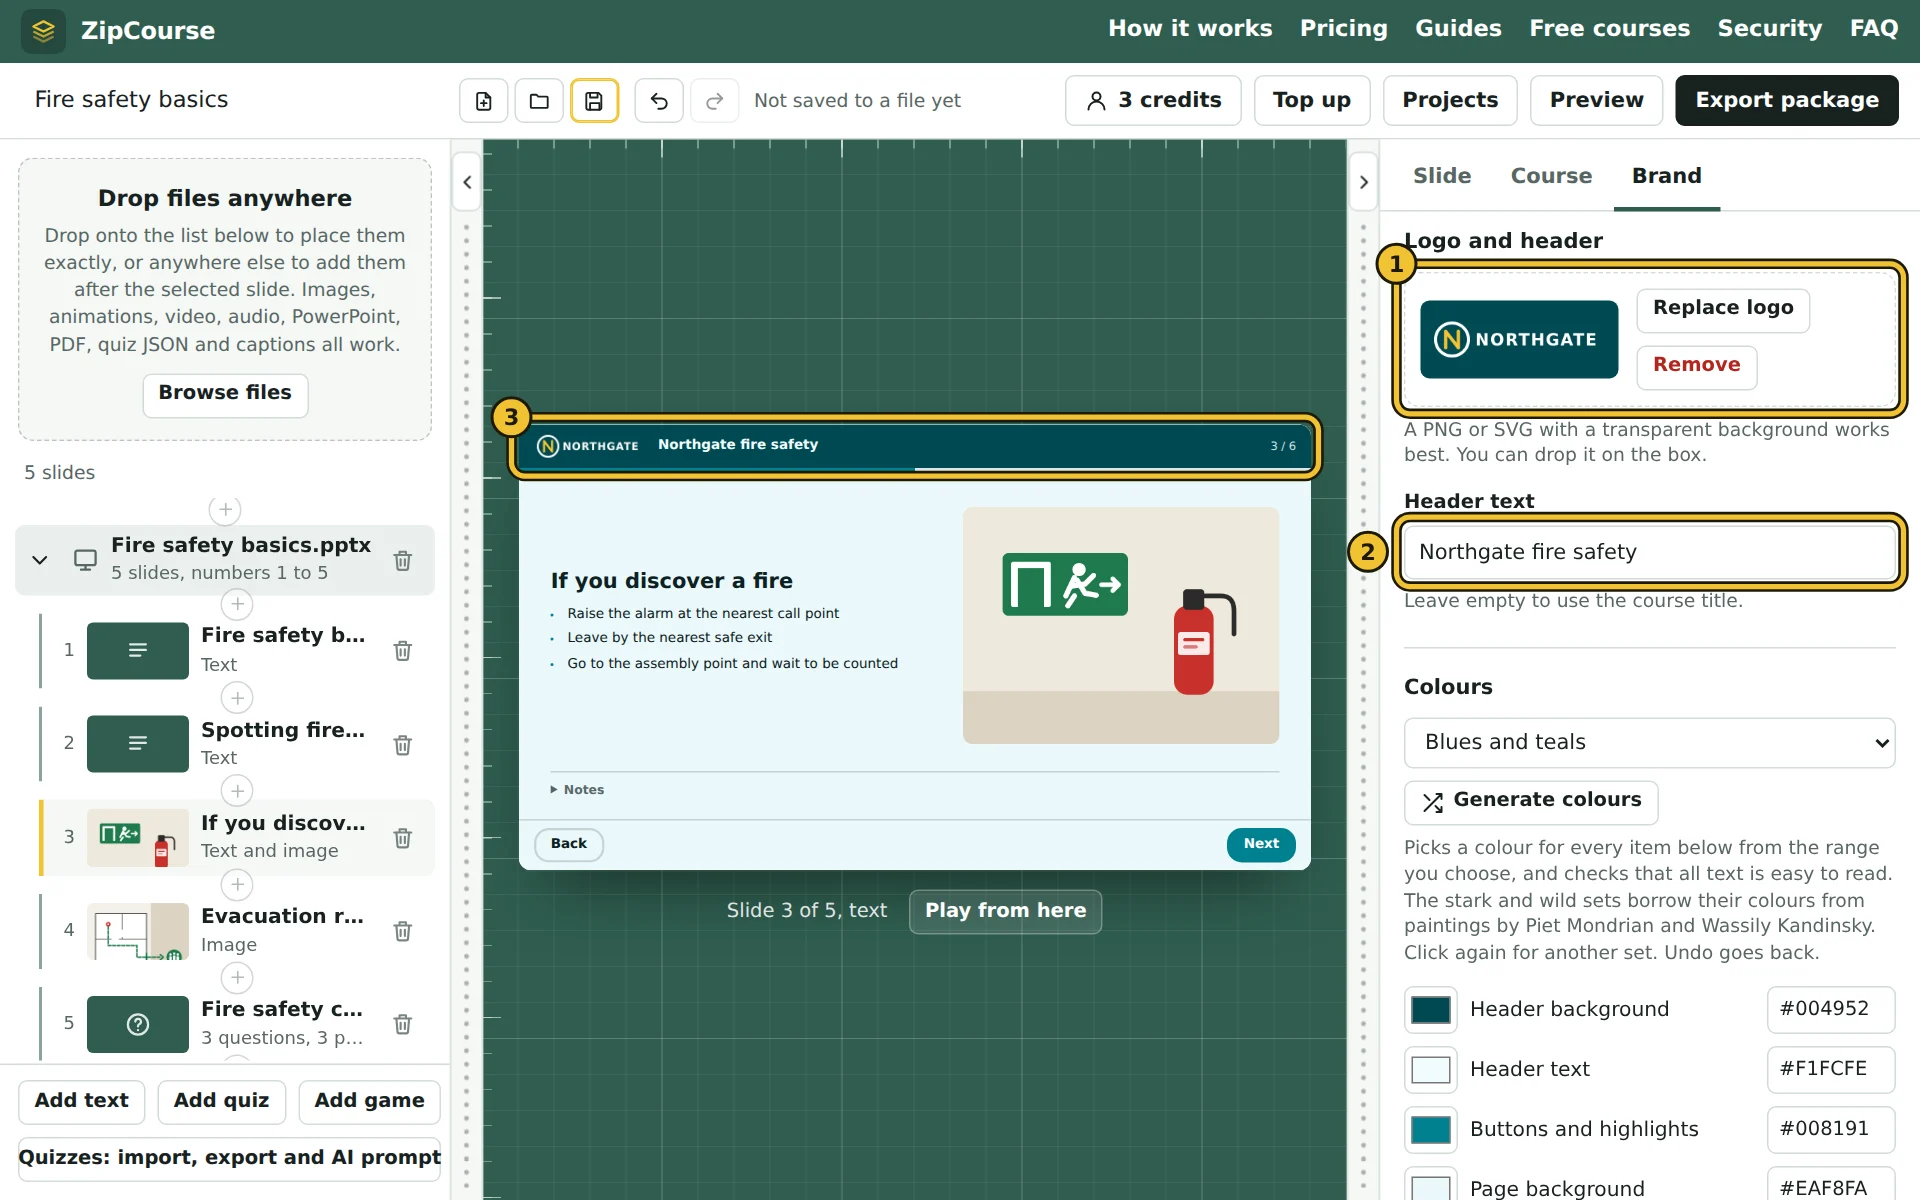
- 1Upload logo, or drop an image on the box. A PNG or SVG with a transparent background works best, because it sits on the header colour. Large pictures are scaled down to fit, and an SVG must be under 400 KB. Replace logo and Remove change it later.
- 2Header text: the words beside the logo. Leave it empty to use the course title.
- 3The header, as learners see it at the top of every slide.
Colours
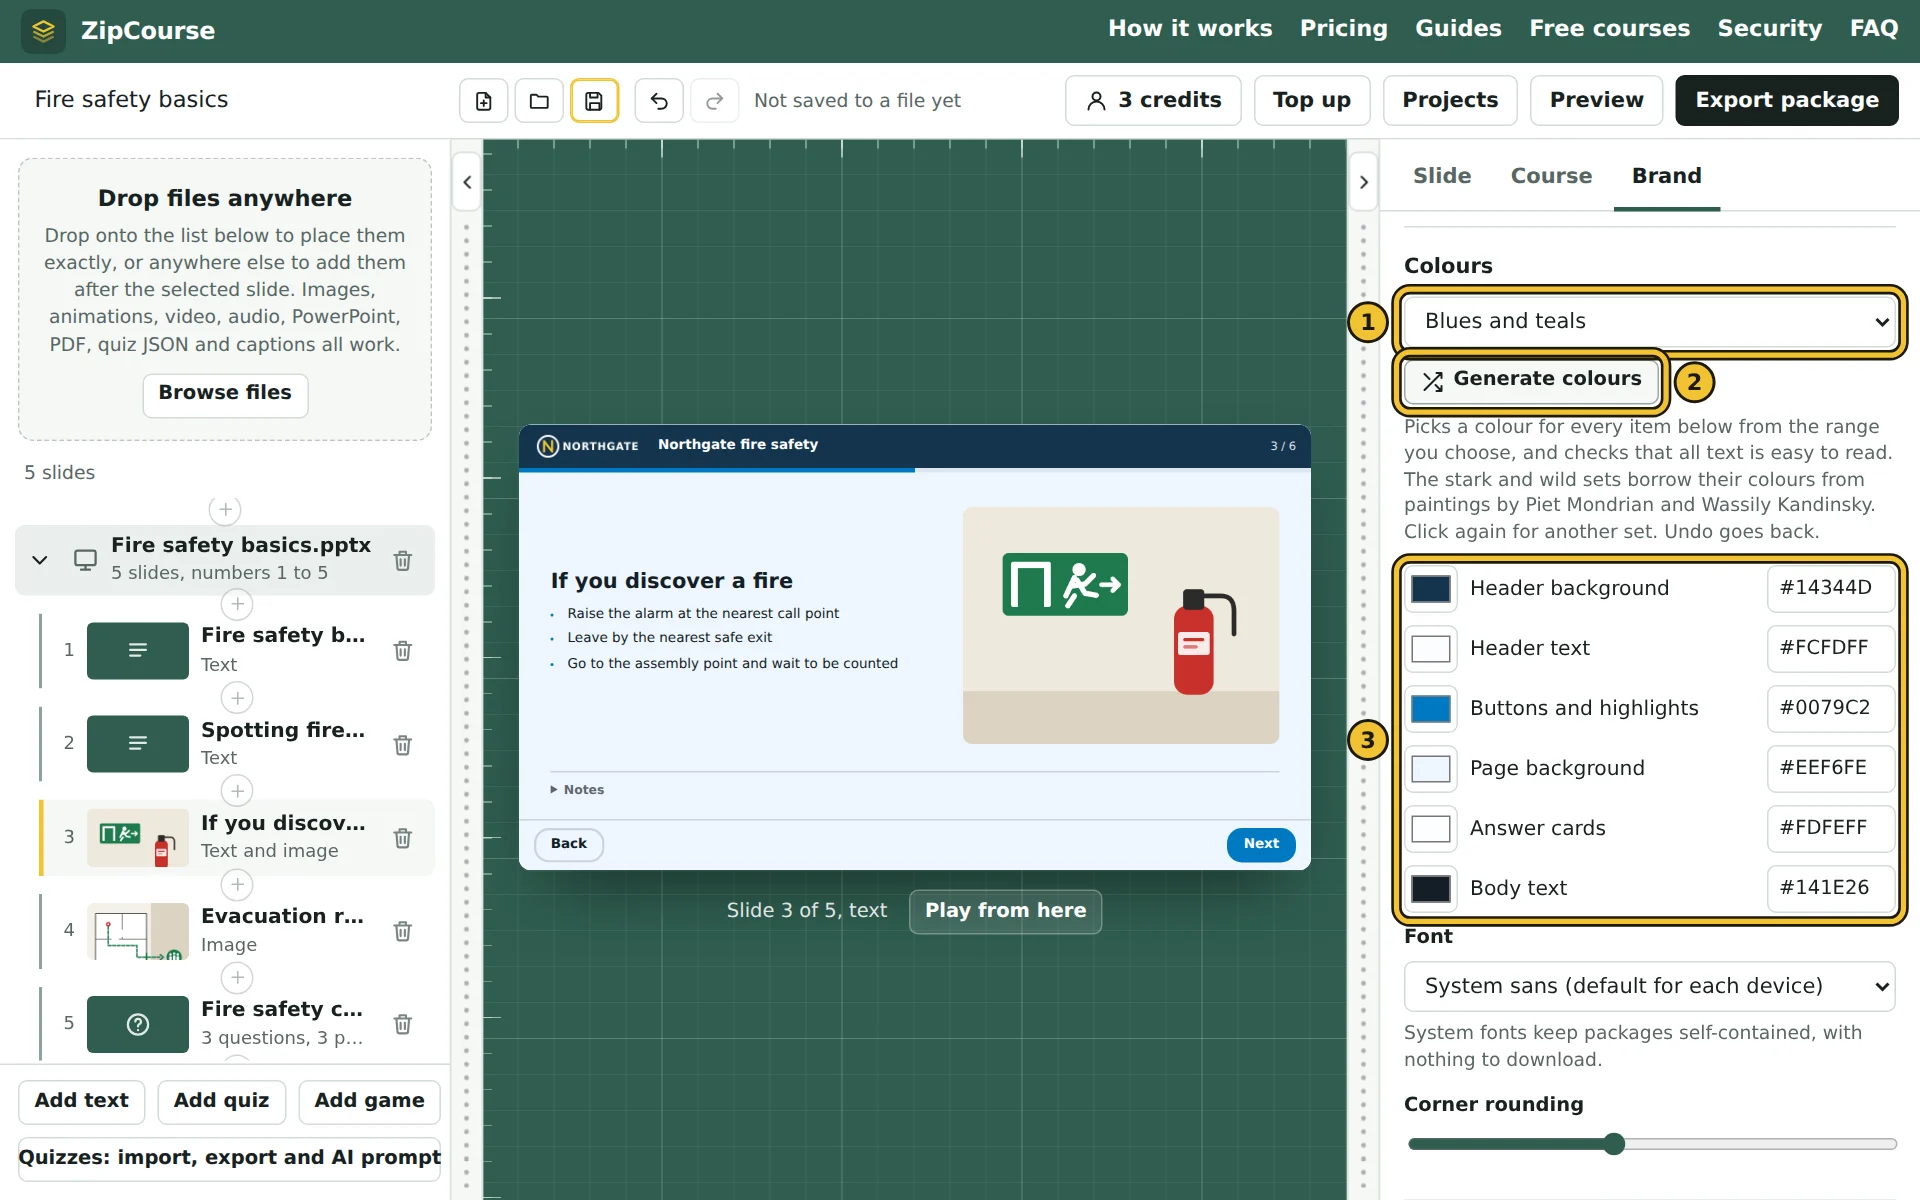
- 1The colour range to pick from: matching colours (any, blues and teals, greens, reds, oranges and golds, purples and pinks, earth tones, or greys with one colour), or the stark and wild sets taken from paintings by Piet Mondrian and Wassily Kandinsky.
- 2Generate colours: picks a colour for each item below from that range. Click again for another set; Undo goes back.
- 3The six colours, which you can also set one by one.
Where each colour goes:
- Header background and Header text: the bar at the top of every slide, with your logo and title.
- Buttons and highlights: buttons, the progress bar, bullet points and the outline round a chosen answer. Text on buttons is set to white or near-black, whichever is easier to read.
- Page background: behind each slide, and the bar of buttons along the bottom.
- Answer cards: the box round each quiz answer.
- Body text: everything else written on the slides. Paler shades of it are used for hints and dividing lines.
Every generated set is checked before you see it: body text has at least 7:1 contrast with the page and the answer cards, the strictest level in the WCAG accessibility guidelines, and buttons, hints and the header are checked too.
To choose a colour yourself, click its swatch or type its hex code. If that makes text hard to read, a warning says which:
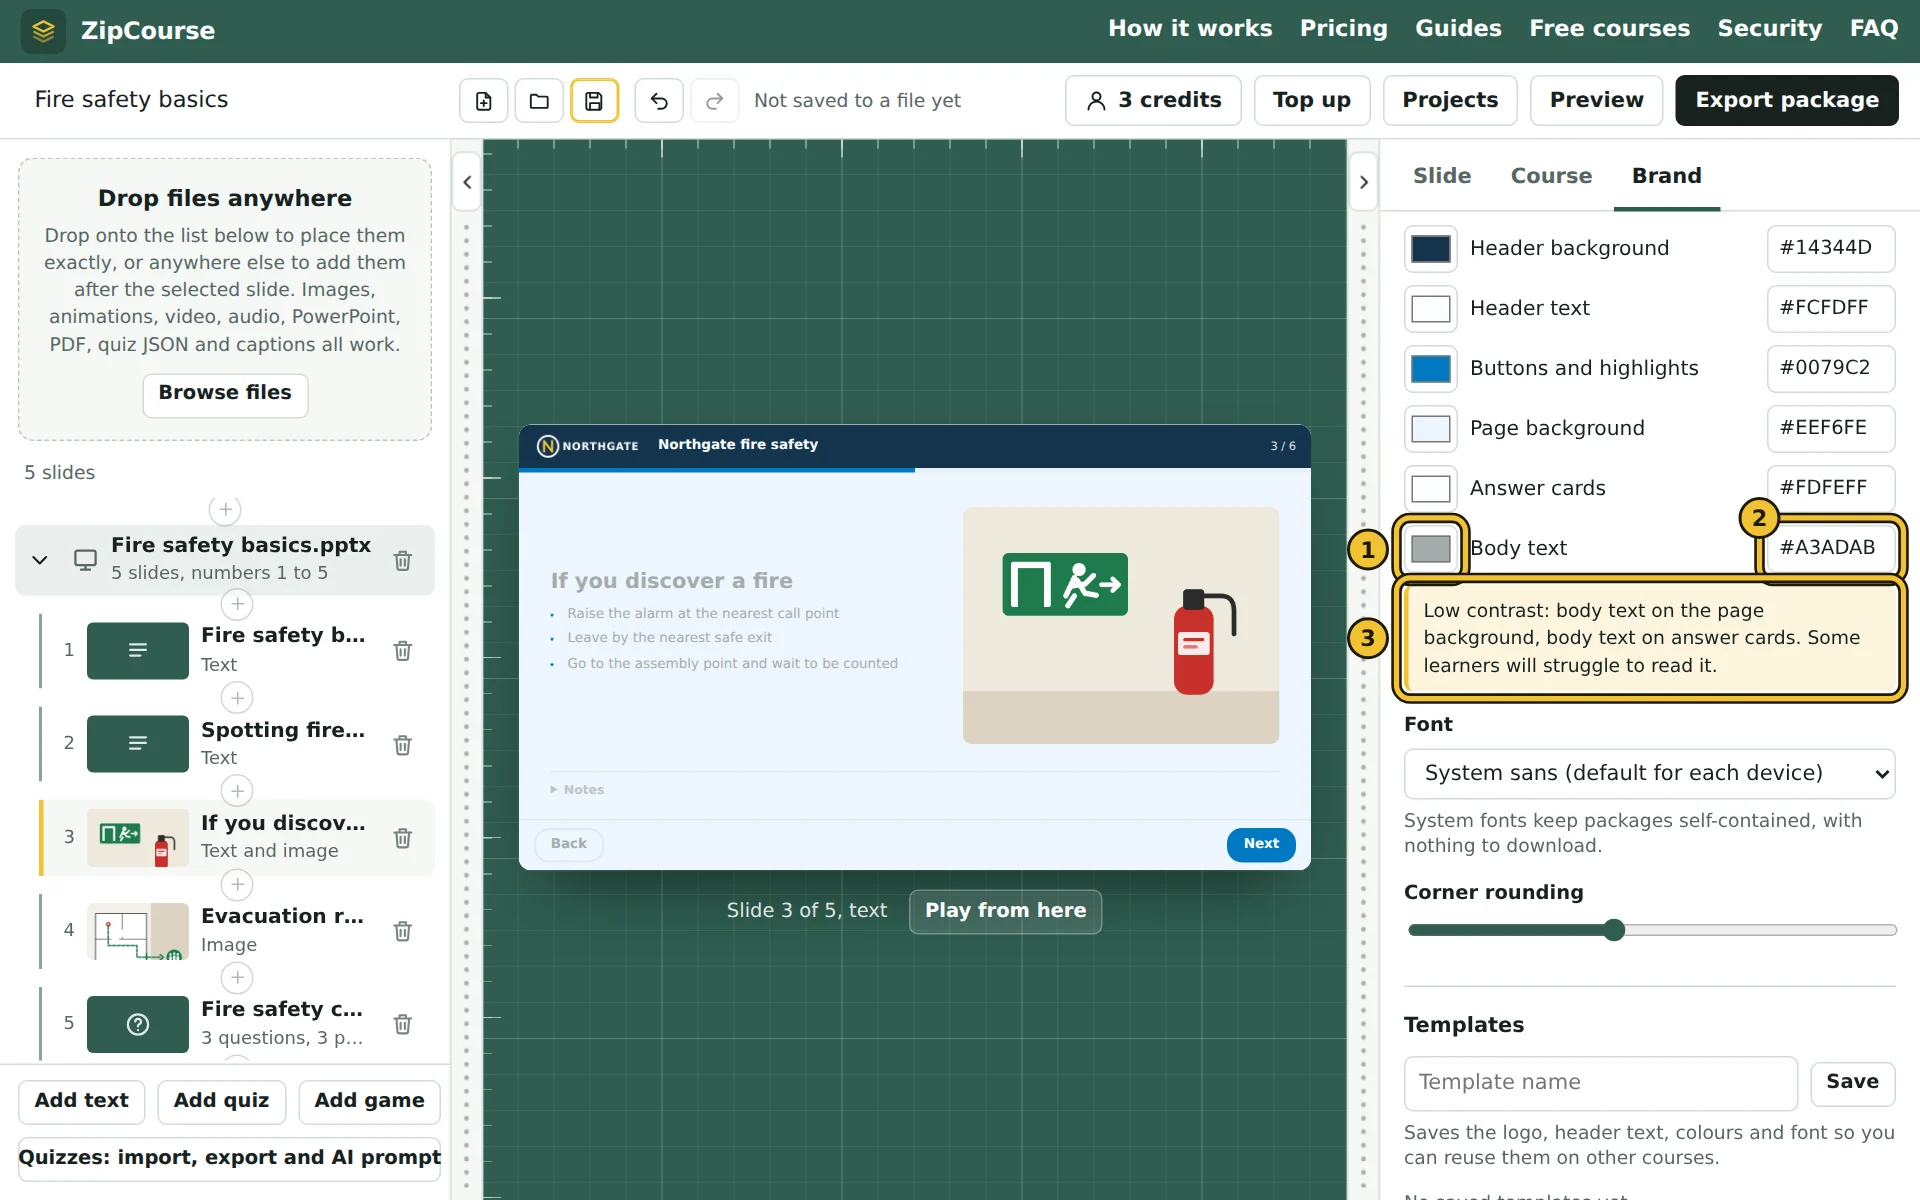
- 1The swatch: click it to choose a colour.
- 2The hex code, such as #1B2422. Type one, or paste it from your brand guidelines.
- 3The warning, which appears when body or header text has less than 4.5:1 contrast with what is behind it, the WCAG minimum for text. Here, pale body text on a pale page.
Font and corners
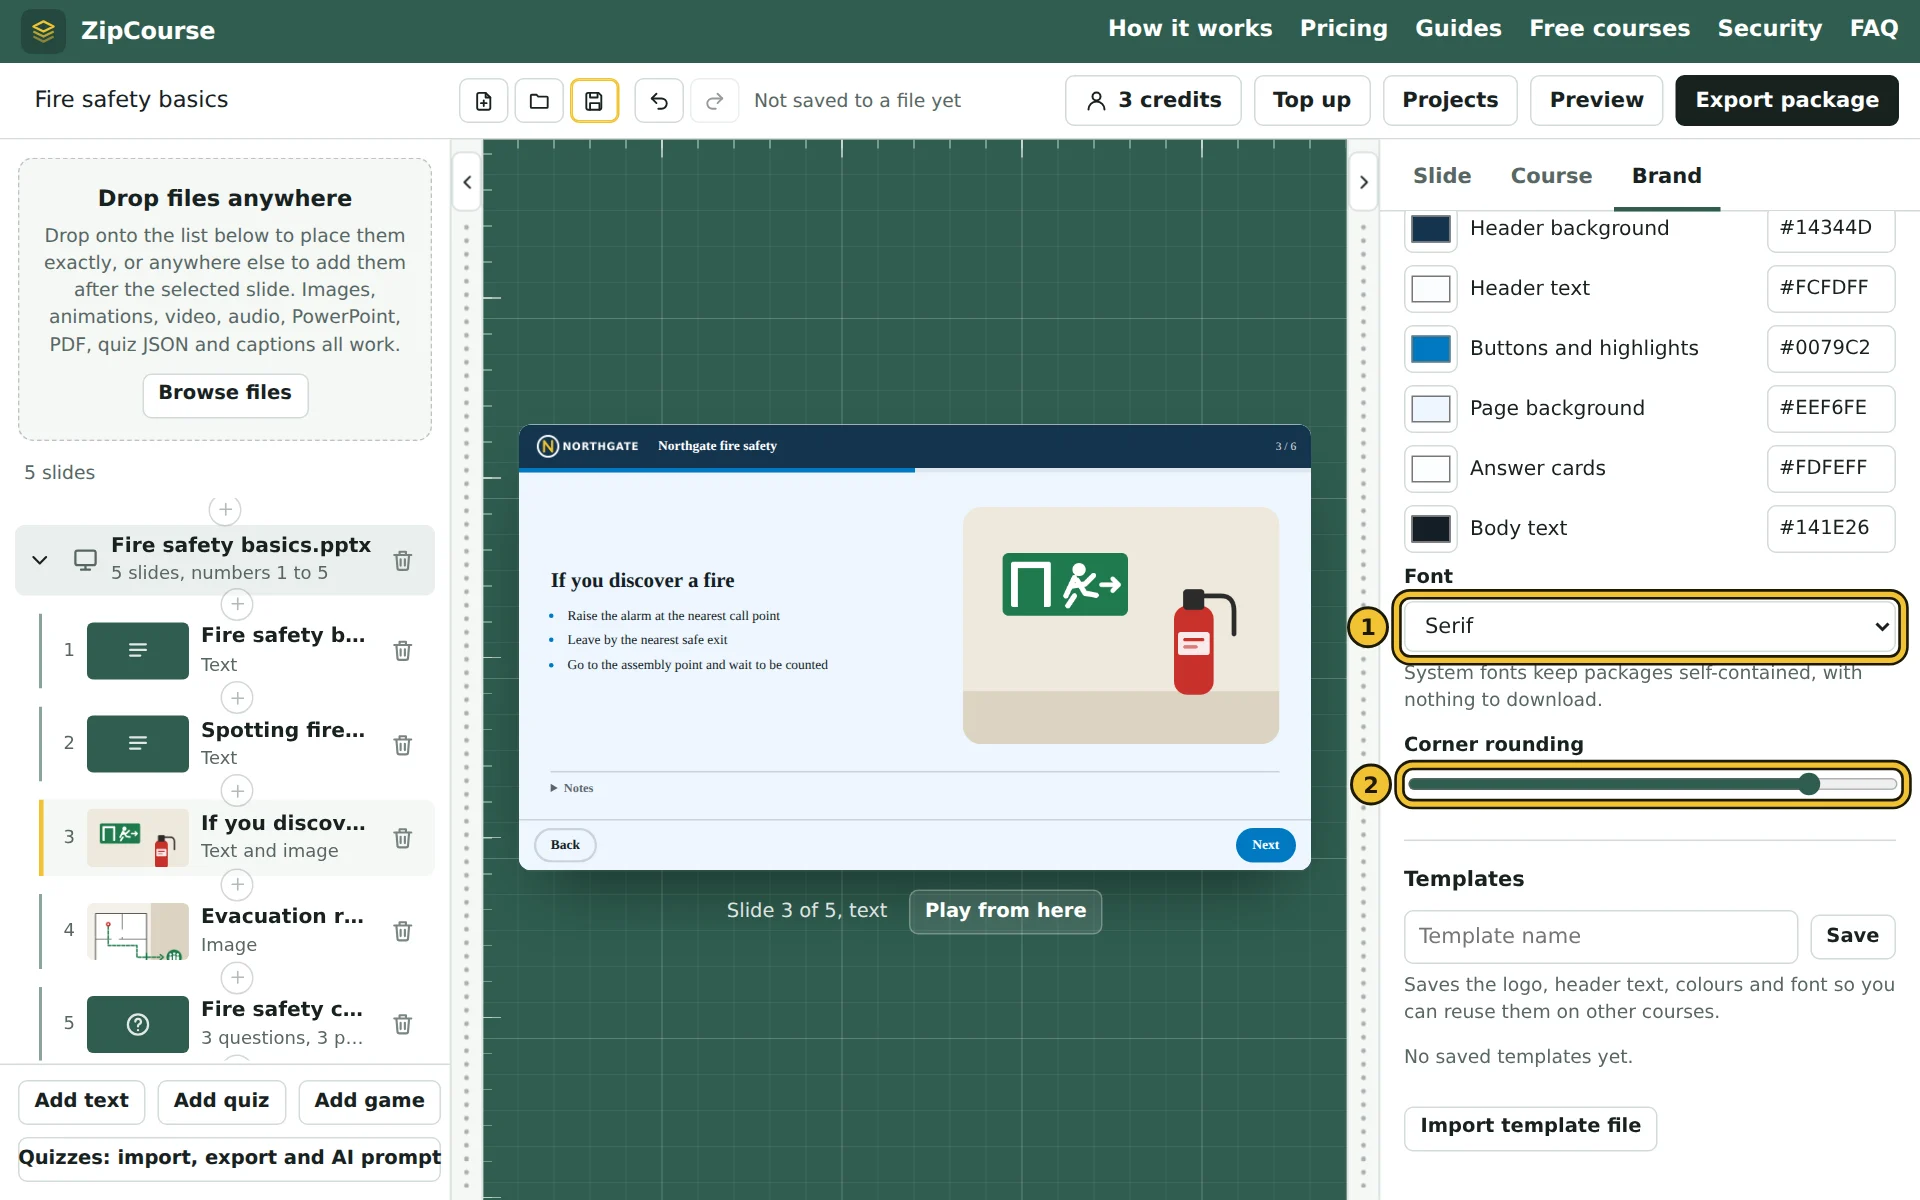
- 1Font: system sans (each device's own), humanist sans, geometric sans, rounded, serif or monospace. Each uses fonts already on the learner's device, so packages stay small and need nothing from the internet. Text may look slightly different from one device to another.
- 2Corner rounding: square corners at the left, round ones at the right. It shapes buttons, answer cards, pictures and videos.
Templates
A template keeps a brand so you can give other courses the same look in one click.
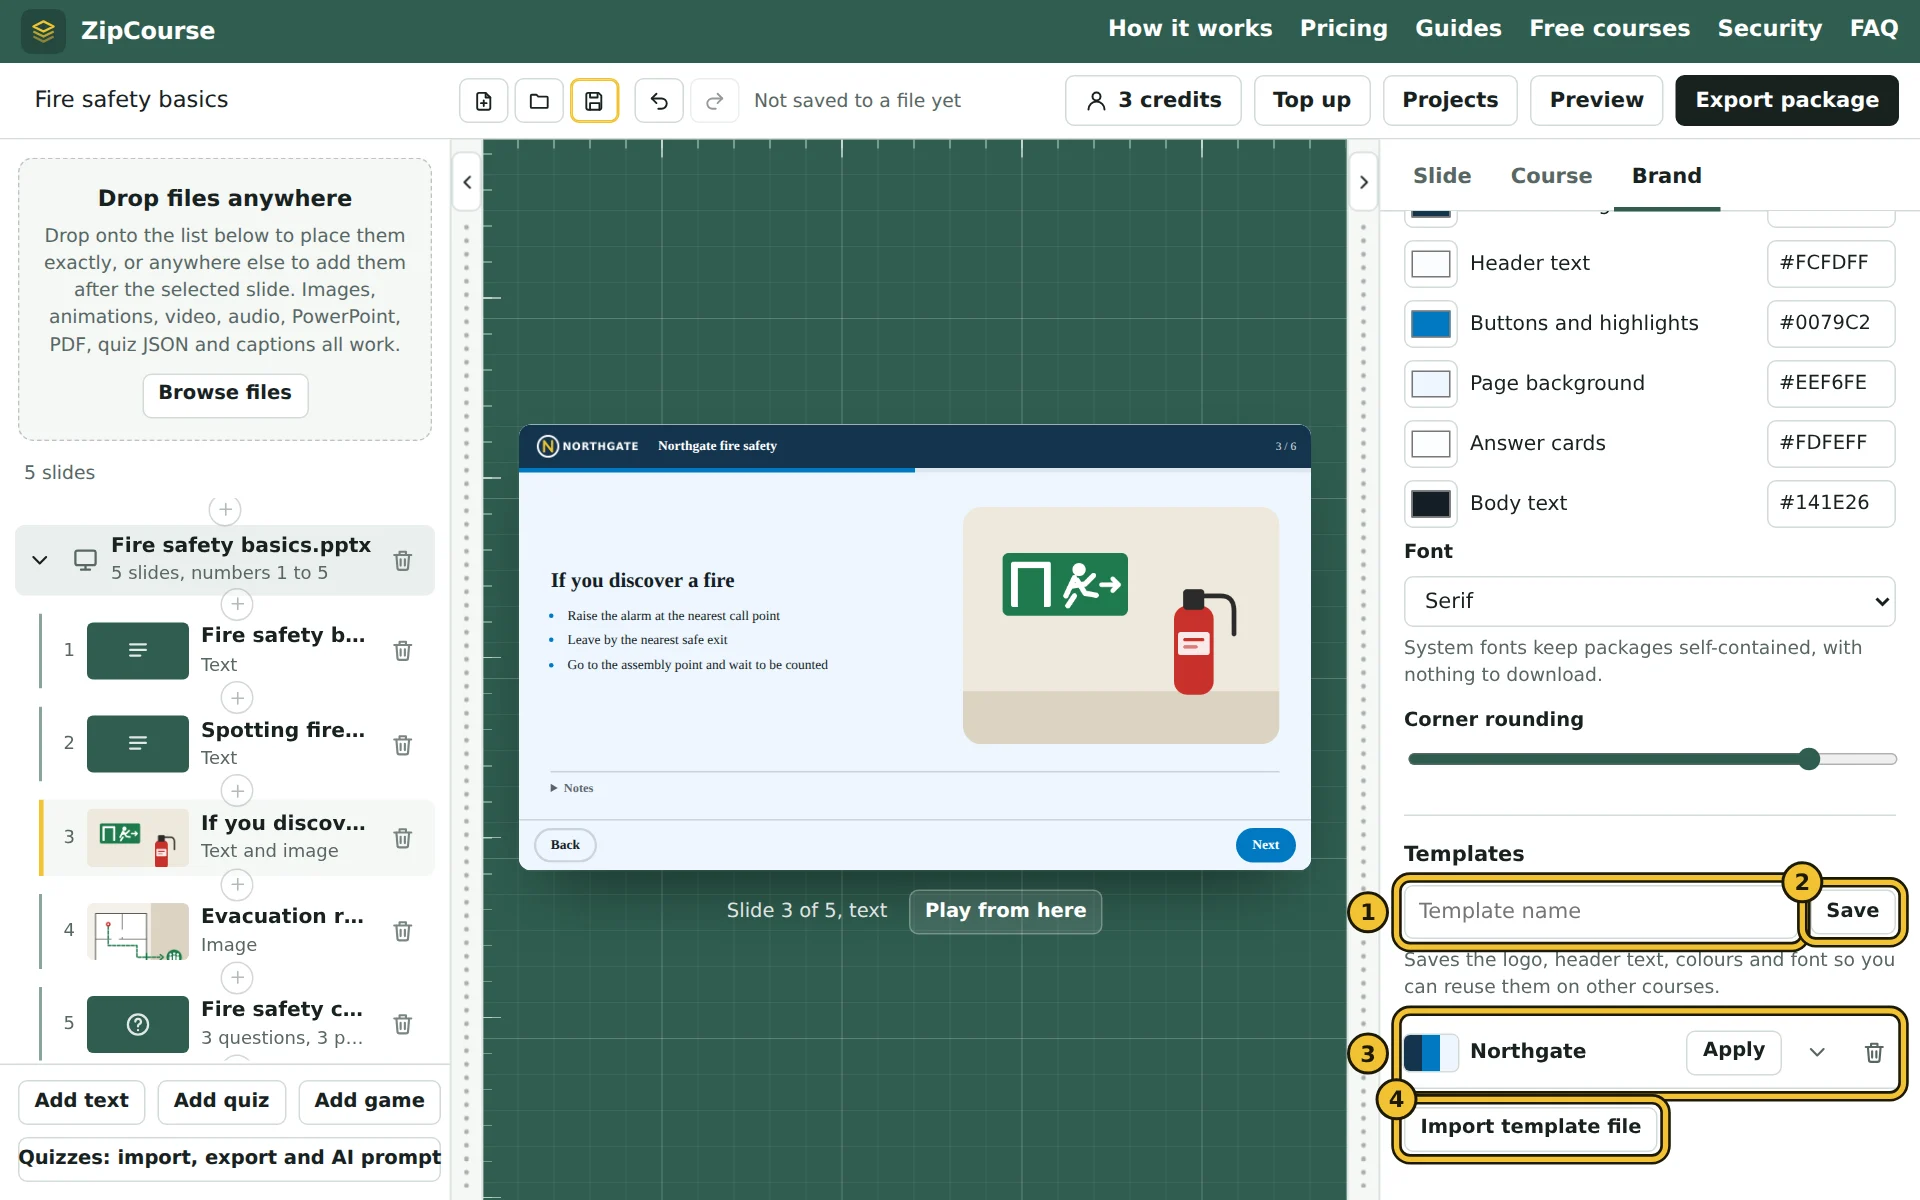
- 1A name for the template. Saving under a name you have used before updates that template.
- 2Save: keeps the logo, header text, colours, font and corner rounding.
- 3A saved template. Apply gives the open course its look; the arrow downloads it as a file, and the bin deletes it.
- 4Import template file: adds a template that was downloaded from another browser or computer.
Templates are kept in this browser. To use one somewhere else, or share it with a colleague, download it and import it there.